


More, Better, Managed Restaurant Photos
Get your smartphone out of your pocket and start using it to increase engagement, traffic, and sales for your establishment.
By Luke LaBree 🔎
CMO, Dennis Food Service
Let’s start by acknowledging the fact that you are busy. You probably “don’t have time to take photos,”… not to mention finding the time to do anything with them. And, if you were to find the time, you’re still not quite sure what to take photos of. If that sounds like you, then this article is most definitely for you.
First, I’ll share with you an excerpt from “Grow Your Foodservice Business with Content Marketing” But, the just of it is, photos of your operation “doing its thing” are beneficial to your business.
“Content is as important to your digital presence and marketing efforts as the food you serve is to your dining room. It shows who you are, what you do, and what you’re capable of – but most importantly – it can impact a visitor’s decision to return. Like a great meal, great content helps customers establish an affinity for your business and brand.”
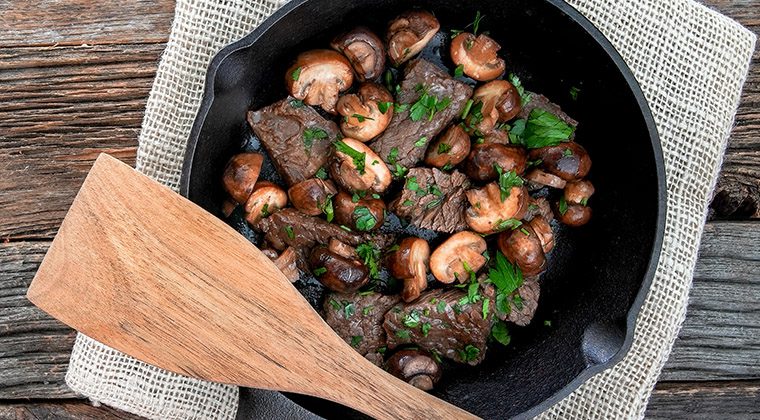
Every piece of content you put out should include a visual. Your visuals can be a photo, video, or some other graphic. Please do not mistake this to mean that anything goes. Keep it real. Preferably it shows your real food, establishment, or people. For this article, we’ll focus on photos. Why? Because a high-quality picture is an easy way to add “stopping power” to your posts. Hopefully, enticing people to slow their scroll long enough to read what you’re putting out there and absorb a little bit of your brand. It also provides an honest visual context of your business – the type of context that helps consumers make decisions.
As I said, the intent of this article is not to convince you to take photos. It’s how to make your photo-taking efforts more productive. My goal is to help you carve out more time for photography, grow a library of photos and improve the quality of an image before it’s used as content.
How to carve out time for photography
1) The “best smartphone available” should be a part of your yearly budget. Using the latest technology ensures you’re getting the highest resolution images possible by taking advantage of new lenses, sensors, and software. Today’s modestly-upper-end smartphones have HDR (High Dynamic Range) sensors and processing features that capture beautiful photos in even the worst lighting conditions. Plus, better pictures on the first try means you’ll be more encouraged to keep taking pictures!
2) Scout your establishment for the best “scenes.” Walkthrough your dining areas and kitchen, view the world through your camera, and discover your best picture-taking locations. I find it handy to carry around a test subject, like a cheeseburger or a salad. Make a note of the areas that are:
- Adequately lit or have unique lighting. (Natural light is always a winner, but things like heat lamps and spotlights can be interesting/unique light sources too.)
- Visually engaging, seasonal, and exclusive to your operation or methods.
- Suitable for providing context about your facility, people, and general atmosphere.
- Ideal for showing staff performing their duties without interfering.
- Highlight customer activity, again without interfering.
3) Make sure your staff knows what’s up. Picture this scenario. You see a moment to capture a great shot. The chef is just about to pour a ladle of sauce over your signature entrée. You take your phone out to capture the magic, and then the chef sees you and stops. “No,” you say, “Keep going.” Quickly they pour the sauce, but it’s before you can get your camera ready, and the moment is gone.
My recommendation for taking photographs in an active foodservice establishment is to instruct staff “not to stop” if they see the camera coming. Only if they asked directly, “Hey Tim, can I get a photo of you/that?” should they stop for a picture. This simple instruction enables you to more effectively capture “action shots,” which can be more exciting and contextual than their “still life” counterparts, helping you better tell your story. It also means the camera is less likely to interrupt staff during busy meal times.
4) Snap, snap, snap and snap. To get a few great photos, you need to take a lot of OK ones. There is generally no concern about running out of storage space when sending your photos to the cloud. Yes, they’re on your device too. The short version is that cloud syncing utilizes compression and other technical stuff to make your photos exist in both places. Modern devices add to this convenience even more with faster processors, increasing storage capacities in every new model, and gigabyte level cloud services. The best photo you get might be the first one, but it doesn’t hurt to snap five more and a bit of video before putting your phone back in your pocket.
5) Look for opportunities to tell a story or show a process. The dishes you serve aren’t delivered to you cooked and plated. Show what it takes to get to the finished product. What goes into creating your best sellers? Is there a from-scratch step? Is there a local ingredient you can highlight? The finished glamor shot or “still life” of a plated dish will always have appeal, but your visitors also appreciate an insider’s perspective. A peek behind the scenes is an opportunity to differentiate. Any reason you can give a potential customer to choose your food over the similar-looking food down the street increases the potential they’ll choose you over a competitor. And, don’t worry if you miss a step. Chances are you’ll have multiple opportunities in a shift to capture production shots of your top sellers.
6) Review them later. Nothing slows you down faster than worrying and reviewing. Did I get the picture? Is it any good? Reiterate point number four to yourself. Snap, snap, snap. Let them go to the cloud.
To help prevent photography (something that is essential preparation for the marketing of your business) from becoming a point of stress, set aside time when you’re not as busy to review and select your “keepers.”
7) Shoot for next week, today. Sure, there will be things that happen “in the moment,” which you’ll want to post right away. But, in general, patience is the better practice. If you set a goal of capturing 100 share-worthy photos in a week, you’d be able to post using a new image every day for 14 weeks before needing to take more pictures. And chances are, you wouldn’t go 14 weeks without taking more pictures.
100 photos overwhelming? Take 30 photos tomorrow from those select 14 keepers. Now you’ve got visuals for seven days’ worth of Facebook and Instagram posts covered.
Manage and grow your library of photos
Let your photos go to the cloud. Incorporating “the cloud” into your photography workflow enables you to view, edit and manage your pictures from any of your devices. Cloud syncing not only helps reduce the stress points mentioned above, but it also helps reduce real-world bottlenecks such as:
- Limited device storage space.
- Files sizes that create sharing limitations (especially with video).
- Ease of access for staff or 3rd party content creators.
- Trying to find that one picture from months or years ago.
Even if you’ve never considered these as bottlenecks to your marketing efforts, they are. With the cloud, they’re a lot easier to manage. Apple and Android include some level of cloud service by default, with an easy upgrade option available. Plus, there are 3rd party platforms available such as Dropbox and OneDrive, with free and low-cost tiers.
Share your cloud. In addition to using the cloud to share a library of photos with your marketing team or content creators, you can also provide “upload” access to select individuals. You could choose to instruct your staff to take photos “when and where appropriate.” And if that’s something you’re comfortable with trying. Well, you’ve just enabled a new source of images to come directly to your library. Want to take it one step further? Credit the staff member who took the photo when you post it online, or reward staff with a gift card during your monthly, internal “staff photo contest.”
Narrow down to your “favorites”… “Hey, thanks a lot, Luke! Now I have to scroll through 200 photos of someone making scrambled eggs. Snap, snap, snap my ass.” Yes, it’s true. This method leads to large photo libraries and redundant images. But that’s OK, and here’s why. On Apple and Android devices, you can tag photos as “Favorites.” Currently, on both platforms, that function is indicated by a “heart” icon. Click the heart to add the selected photo to your album of favorites. The next time you’re looking for a picture to post, you can skip “All Photos” and head right to your “Favorites” album. This strategy saves time otherwise spent “looking for the good one” when you want it and time perseverating over numerous options. Plus, if you’re working with an external content creator, they’ll know which of the 200 scrambled egg pictures you prefer they use.
Don’t trash the unused photos. Yes, you can delete the blurry pictures and the shots where someone stepped in front of the camera. But, the other “OK” photos can come in handy for several reasons, such as:
- You want to promote something several weeks in a row and know you should use a different picture each time you post.
- You want to promote something on multiple platforms simultaneously (Facebook and Instagram, for example). You know that the best practice is to use different photos for each so that the users who follow you on both platforms see slightly different visuals. This reinforces the need for them to engage you on multiple platforms. (Using the same content, at the same time, on multiple platforms has the opposite effect over time.)
- When playing the role of photographer, we sometimes click the “video” button by mistake and end up with a short video clip instead of a photo. No problem, pause the video and scroll to the point where you wanted a picture. Then take a screenshot.
- Sometimes we take a photo but wish we’d gotten a video. Most modern smartphones now take what is called “live” photos… the photo turns into a video when you press/hold or choose the playback option. These “live” photos can be exported as video clips. That bad photo might be a great video clip in disguise.
Here’s the key takeaway on trashing photos. Unless you’re on the verge of running out of cloud storage space and no upgrade options are available, keep all your photos except for the very worst.
Improve the quality of photos for better content
I’ve used digital photography and Adobe Photoshop for over 20 years. I can tell you with absolute certainty that there has never been a better, easier, or more accessible time than now for the average individual to take, edit and share stunning imagery. That “power in your hands” is increasing daily with advances in technology. Again, this is why I recommend that a high-end smartphone makes your list of indispensable restaurant equipment.
SnapSeed is a powerful photo editing application (or app) for smartphones and tablets. It’s also a completely free app and is available for both Apple and Android devices. SnapSeed features around 30 different tools and filters which let you easily turn your average-looking food photos into mouthwatering masterpieces. The feature set alone is enough to warrant a separate, lengthy article. Bottom line, I highly encourage you to download the app and experiment with it for yourself.
One of my favorite features in SnapSeed is the “Undo” option. SnapSeed’s ability to review the changes you’ve made to your images is unprecedented. It gives you the standard ability to undo the last change you made, as well as the ability to view all the edits you’ve made and then edit them individually. SnapSeed also lets you save your photo, open it back up later, and still have the ability to adjust or remove any of your edits.
In practice, this means that you can use SnapSeed to turn one of your pictures into a gorgeous black and white photograph, and then a few weeks later decide to share a color version with some stylized text as a social media promotion. It can all be done using one photo and SnapSeed. The undo-magic comes from SnapSeed’s convenient export feature. Choose the first option, “Save,” which saves your photo with changes you can undo. You can also choose “Save a copy” or “Export,” which both leave your original photo completely untouched.
Suggested workflow for using SnapSeed to improve your photos
- Take a whole bunch of pictures.
- Review your photos for “keepers” and add them to your Favorites album.
- Let all the rest, except for the very worst, go to the cloud.
- Edit your keepers in SnapSeed
👇 Next, polish your pictures SnapSeed
- Open the SnapSeed app, then click “Open” to open a photo.
- Choose “Open from Device”
- Choose “Albums”
- Choose your “Favorites” album
- Choose the photo you want to edit.
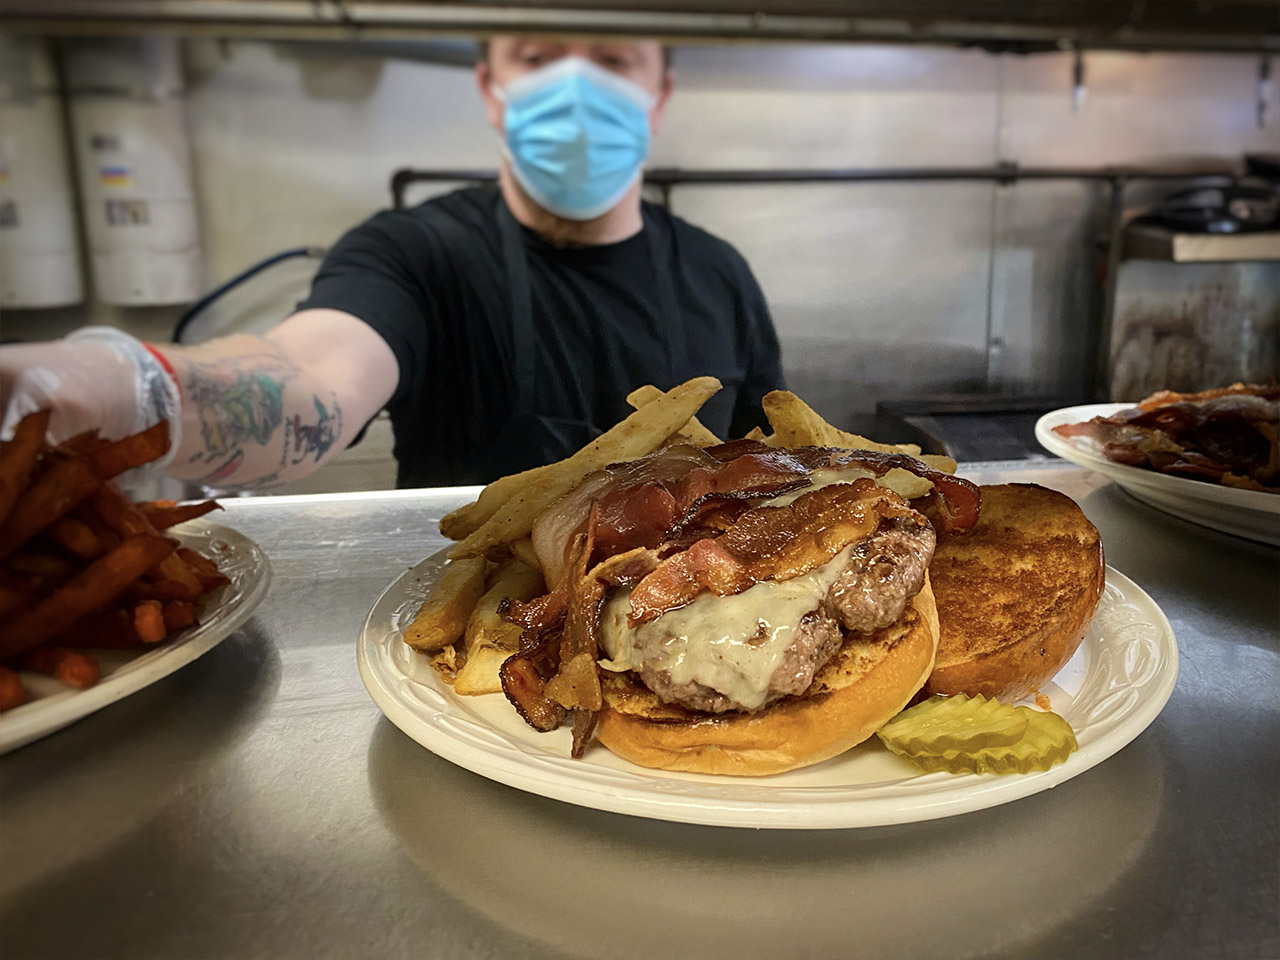
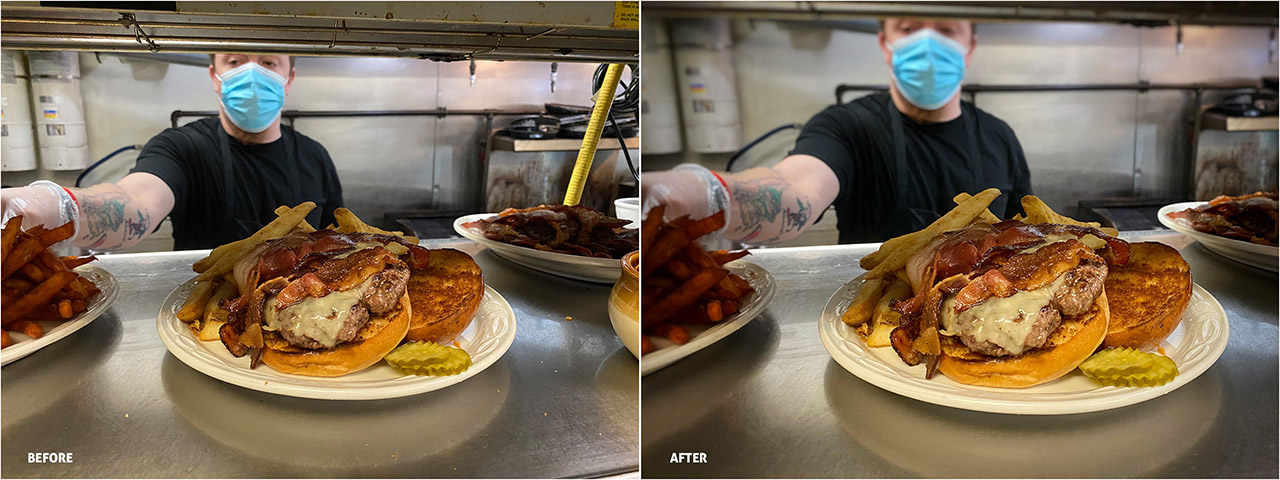
Example
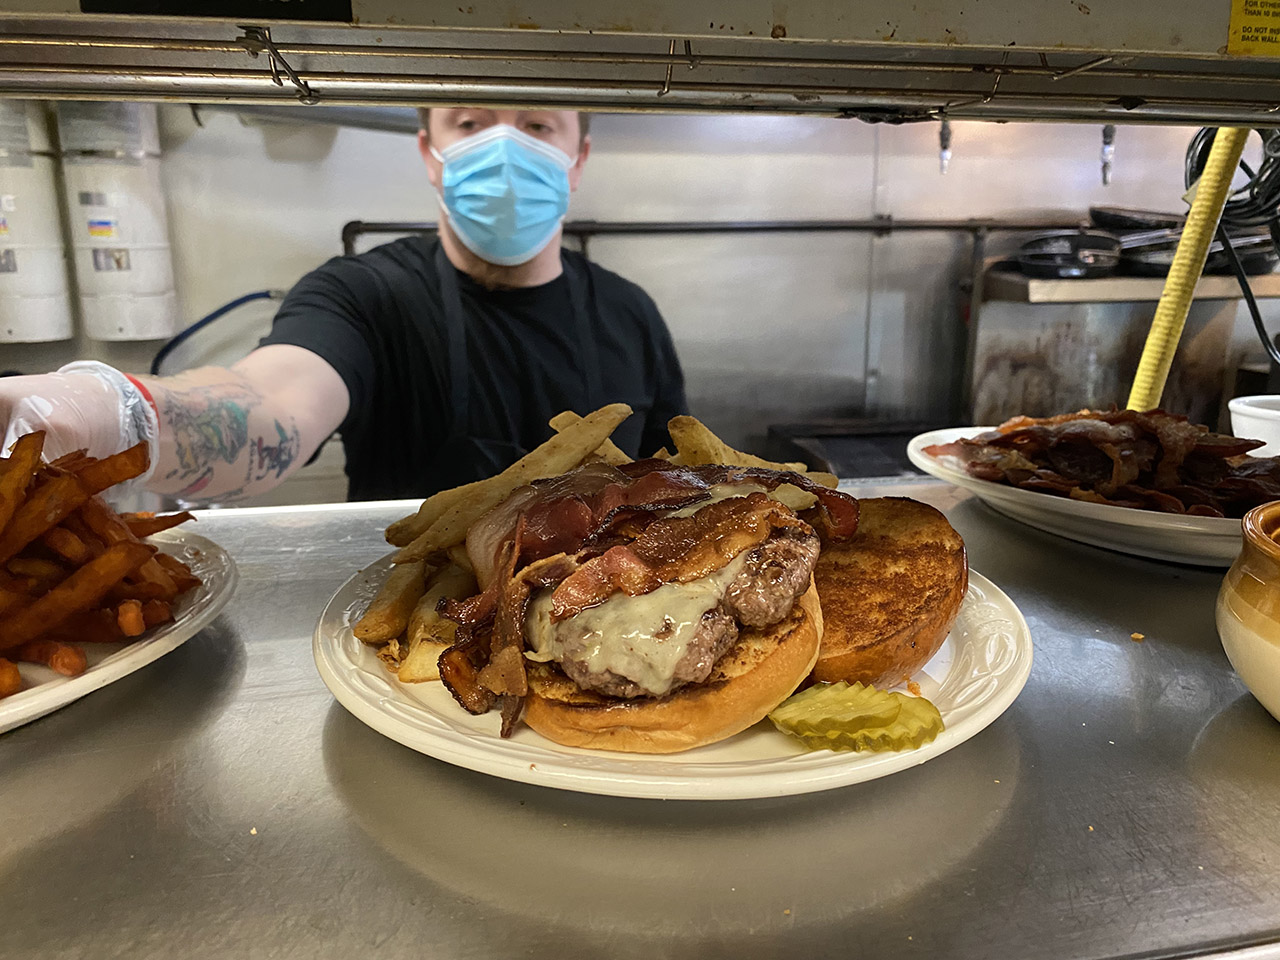
As an example, I’ll be using (this👆) an average-looking photo, which I took using my iPhone earlier this month. It’s an image that could have been taken at thousands of restaurants around the country. And that’s the point. I want this to be relevant to real-world use. The edits we’re focusing on are basic adjustments to enhance your photos. We’re not aiming to win a major photography award here. We’re taking small steps toward improving your visual content.
To the photo, I made minor tone and color adjustments. I noticed crumbs on the stainless steel, which are easy to remove with the healing tool. The top and right sides were also a bit distracting, and so I cropped out the gas line and heating element in the service window.
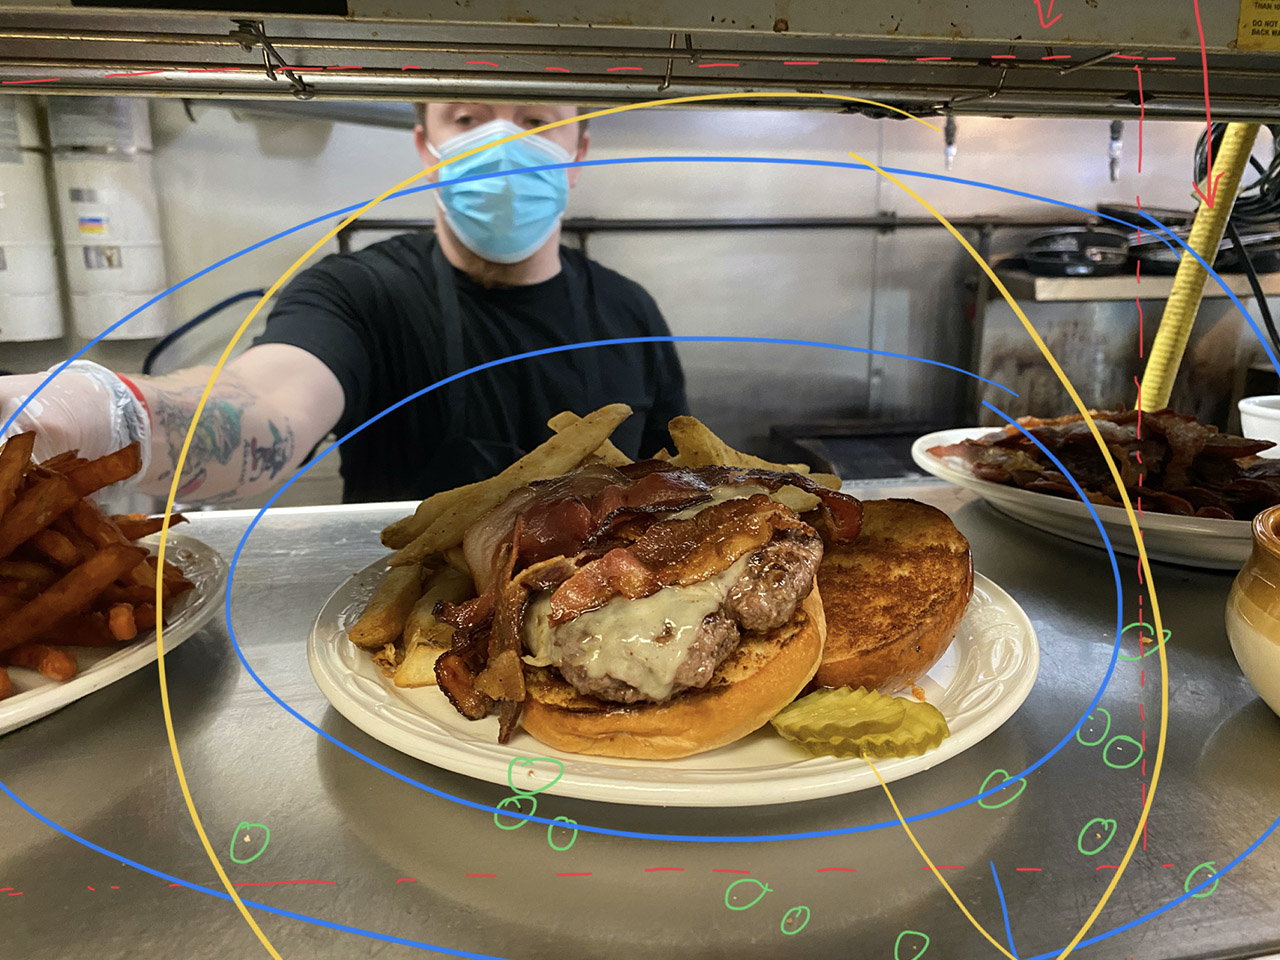
The Edits
- “Healing” tool to remove the crumbs (Green)
- “Crop” out the distracting elements from the top and right sides (Red)
- “Lens blur” to put additional focus on the burger (Blue)
- “Vignette” to darken the outside and bring more attention to the burger, lightening the inside to make the burger pop just a little bit more (Yellow)
- “Tune Image” to very slightly adjust the “Ambience” and “Saturation” to improve the tone of the image.
Before & After
Lastly, here a few tips to keep in mind when editing your photos.
- A little goes a long way. Please don’t overdo it. It doesn’t take much for food photographs to look over-processed.
- Start with the basics first… Color correction, Cropping and rotating, Healing, Tuning shadows and highlights.
- Use the Vignette and Lens blur tools “lightly.” I’ll even admit that I’m not completely satisfied with the lens blur I added in this photo, as it feels a little forced. But not many people will notice, so don’t perseverate too long. Push it out and move on.
- Explore the “Text” tool, but use it selectively and sparingly. Overuse has the potential to become a distraction that can take away from your photo’s appeal.
Remember… Snap, snap, snap. Review when you can. Love the ones you like. Use SnapSeed to export a mouthwatering masterpiece that you’ll post next week.